Thursday, June 16, 2011

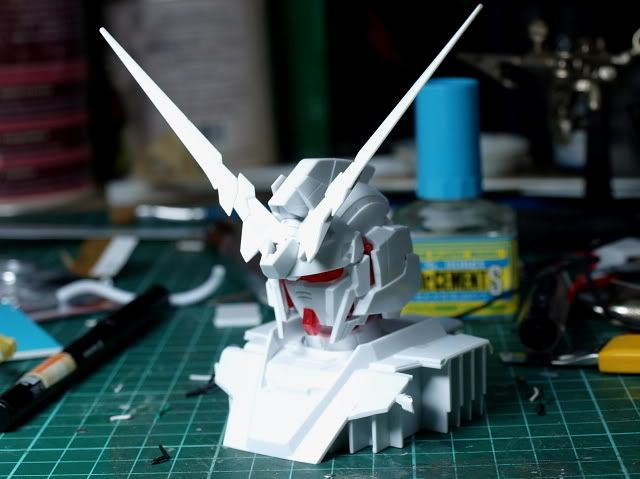
Unicorn Head WIP

Unicorn Head WIP #1

One day, I was just thinking what happen when these 2 combined?


**********************************************************************************

45minutes later.........

Snapfited the head: Looks smaller than I expected, but overall build is pretty good; almost 90% similar to MG.

Put the base upside down, it's pretty spacious where a small circuit board should have no problem hiding inside.

Was deciding how the USB female port should be placed, either horizontal or vertical....


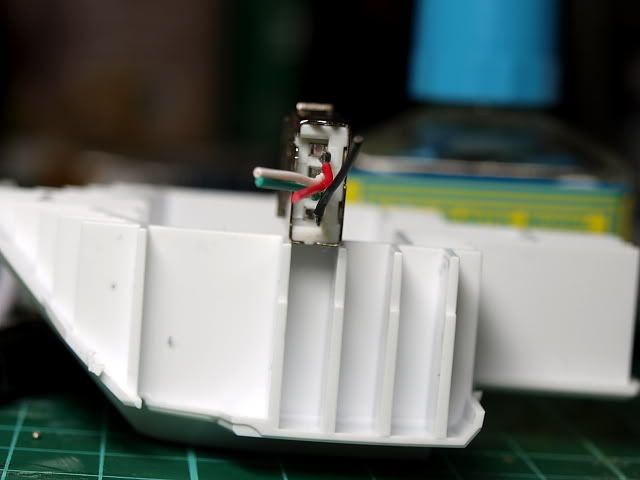
Finally decided to line them up horizontally. So it's time for some chopping n sawing.....


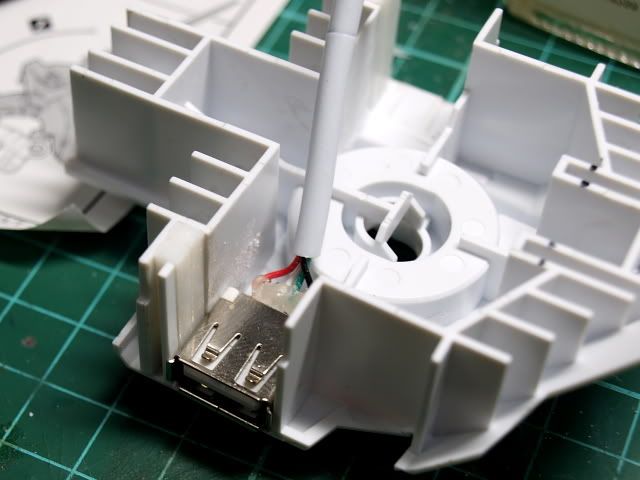
Test fit. Realised I need to sand down one of the inner wall n add some pla plate to fill up some of the empty space. Finally it fits. :)


Just add some pla plate to fill up gaps in between the 2 inlet. Later will add more details.

***********************************************************************************

Circuit board time.......

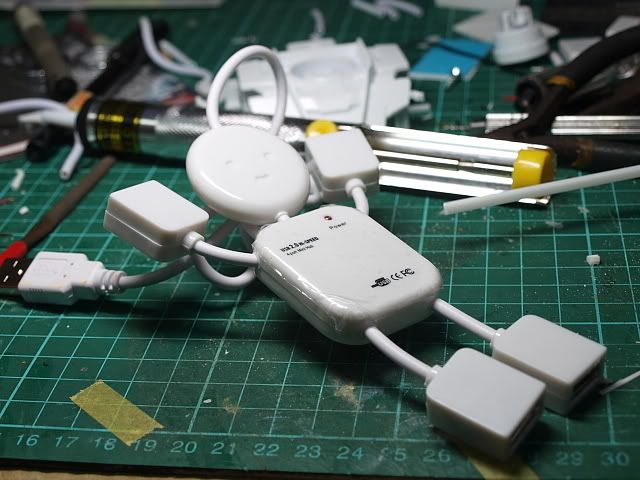
Mr Lelo is looking good... (I can't help but give him a name... Pretty cute USB hub....)

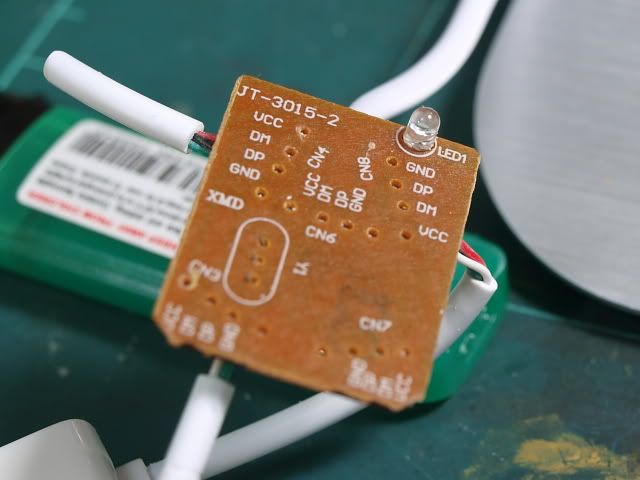
Time to strip the bugger off. Muahahahahaahah...... The circuit board is smaller than I expected, which is a good thing.


Try the circuit board. It fits so well that it really surprised me! Overall just need to chop off 2 parts and the entire circuit board fits nicely into the inner chest.


The USB hub comes with a small light, lit by an LED. The light source is extremely weak and it's in green color. So weak I even have hard time to capture it using camera. Since the psycho frame color of the Unicorn is red, I will change the LED to a red one.

Ok, LED changed. Now check whether the circuit board still working or not. This is because Red LED n Green LED have different voltage, n since I didn't change the resistor on the circuit board, is better I double check (Although the chances of frying the circuit board is slim because 1) Red LED uses lesser voltage than green ones, meaning less burden for the resistor. 2) although they use different voltage, the difference is basically very small, within the variantion of 1V)

I tested the board by connecting all the ports to an USB mouse. Yes, everything's fine, the mouse optical lens is working!!!!


Now test on the head; the light seems a little stronger than I would like it to be. Later will find ways to make it dimmer.

***********************************************************************************

Installation Process

Basically since it's very easy to damage the circuit, I decided to seal up the base before spraying paint. Hence I gotta think of the easiest way for assemble.


Drill holes on the neck part for the wire to go thru into the head.


Seems like everything's fine. I m luckier than I thought :p

**********************************************************************************


More or less is done. Next step would be painting....... (To be continued. Hopefully I m not too lazy to snap photos.....)

Friday, May 20, 2011

I Have A God

I have a God.

The relationship between us should have been closer than it's, now.

He always give me a reminder of His existence, not by any other thing, but loads n loads of gifts n presents. So many of them that makes me feels embarass on how I repay him all this while.

Sometimes, many times in fact, His gifts are not only fulfilling what I need, but more than what I had expected. It always surprise me in a very nice way.

Just like today.

And yesterday; and the day before, and many other days that I could remember.

That's probably the main reason I m looking forward to tomorrow so eagerly.

Because I have a God.

Tuesday, May 3, 2011

Hasegawa Egg Plane F14 Tomcat

This is a fun build in the year of 2009, for Singapore's MWorkshop Hasegawa Egg Plane Group Build. Thanks Acheo for carrying it to Singapore  :)

Basically, this is suppose to be a fun n stress free build; though it's not as easy as it looks like. Quite some ground work got to be done. Eg. the seamline that goes thru the entire kit, and the lack of details in many parts, and a little bit of fitting problem.

Though it's a reissue of a very old mold, afterall, it's by Hasegawa. Overall is still pretty good, looking at the age of its mold.

Learned quite a fair bit about mark setter n mark softer: The 2 chemical used in tackling water slide decal on even surface.
Overall, still a very happy experience, especially due to this kit was done together with many friends in the workshop. A nice part of my modeling memories; I really miss those who r now semi retire from this hobby.....


Photobucket


Photobucket


Photobucket


Photobucket


Photobucket


Photobucket


Photobucket


Photobucket

Thursday, April 28, 2011

Daihatsu Copen Wip (Part 3)

Update: 28 Apr 2011

While busy repainting n tackling the problem on the car body, I continue to take some time to continue on other parts of the kit.


Suspension

Photobucket

Ok, I m lazy, I admite that.... Instead of scribe off  spring on the suspension, I m using a thin wire to wrap around it. The main reason I m doing this is because basically the suspension is not really visible after assembly; basically all I want is some glimpse of other color than the chasis (Black) to create the impression there's a suspension made.

*********************************************************************************

Brake Disc

This is something absolutely new to me; and is one of the high point for me in this build. A metal brake disc. I think the visible real metal color does add up to the overall impression of a plastic model kit. Just love how other modelers r using them. Hence, decided to give it a try in this build.

Photobucket
This is a photo etched brake disc. As Entau's pointer, I do agree the original texture of the metal doesn't look nice.

Photobucket
Cut out a small piece of pla plate, screwed tight, n put it on a router. The double sided tape is for the purpose of securing the photo etched piece onto the pla plate.

Photobucket
This is how it looks like before I have done anything. All the marking on the pla plate is actually to make sure the photo etched (PE) brake disc is placed in the centre .

Once everything is done, START UR ENGINE & MAKE IT SPIN!!!!!!

Photobucket
With the help of sand paper, I m recreating the texture on the disc, which in real life, is created by the brake pad.

Remark: Learned something here again. Entau was suggesting me to use sand paper of 320 grit or below. However, being cautious, I afraid that grit might to too rough and spoil the whole thing. In the end, i realised due to I m using a finer grit, I need to apply more force n sand it longer. This prove to be a mistake, because the longer n harder we push the sand paper onto the PE part, the easier we will make mistake.

Check out the photo, u can easily see an even force being applied n the texture is not unified.

Photobucket
Before & After: Left (Original), Right (After sanding)

Photobucket
Done!!!! I m pretty happy with the result! :)

********************************************************************************
Metal Transfer:

My personal opinion: Metal transfer does add life to a kit, especially car model kit.

Most of my group of friends are actually from Japanese anime based kit modeler, metal transfer doesn't seem to be very popular n well utilized.

My point is, besides car emblem, metal transfer actually can be used creatively; as other option parts in Gundam or other model kits. Below I will show how 2 gunpla modelers (Klay n I)  utilize the creativity in Gundam modeling  n apply it onto a car kit.

Photobucket
This is how metal transfer decal look like. Basically the shiny parts are real metal, very thin n coated with a self adhesive membrane at the back.

Photobucket
The air cond outlet: The original outlets are pretty ugly. No panel line, not much details neither. I sprayed the light gray first, and hand painted the inside part with enamel dark grey. Since there's no marking, detail, nor panel line, everything's done "agak agak" only.

So I use a ring shape metal transfer piece to cover up the edge. Purpose:
1) to cover up the uneven n ugly border of the light n dark grey.
2) to divert the attention of the viewer "from" the ugly air cond outlet "to" the blink blink metal part.

Photobucket

Besides that, there's another small accident happened: The original decal (Ugly, but I had no choice because the steering wheel is really empty) was accidently torn off.

Klay was around in ICW that time so I passed the task to him with just one instruction: "I dont care what u do, as long as I want this steering wheel doesn;t look empty n looks good again" I left it to his creativity.

In the end, he used 2 piece of metal transfer, 1 ring 1 that looks like a "G", put them onto the steering wheel which I think the end result's pretty ok.

Photobucket

That's all for this round. (Go back to the car body again.... Sigh)

Thursday, April 14, 2011

Kotobukiya 1/1 Hoi Hoi San

This is quite a fun kit from Kotobukiya, not extremely user friendly, but easy enough.

Was testing n practicing on very subtle pre-shading with loads of fluorescent color. The final effect ain't really what I expected; but not too bad.

Not much modification, just mod a little bit for separate parts coloring. Overall, it's just a fun n stress-free build.  


Overall
Photobucket


Photobucket


Photobucket


Photobucket
 
This is the main problem I had for this build. Initially, the seamlines on the hair was covered. Due to the mechanic design of the hair, that part was extremely fragile. In fact, there r some parts that I didn't even anticipated there would be force during assembly.
As a result, there's a crack.....T_T

Photobucket


Photobucket


Photobucket


Photobucket


Photobucket


Photobucket


Saturday, April 9, 2011

Daihatsu Copen Wip (Part 2)

Color:

The color of this car: am thinking of a color shifting metallic effect; either a 1 color color shift or a 2 color one.

Paint tested:

1. Alclad's Prismatic paint:
Photobucket
It must be something i m not doing it right. When I spray a very thin layer, the color didn't turn out bright enough. In addition, there's quite some noise spotted.

Second attempt, spray a thicker layer. The duo tone effect's visible, but still think the particle is too large for a 1/24 scale car body.....

P/S: In the photo, it looks like it has one tone of blue only. This is mainly because i m having problem capturing the red tone....
*********************************************************************************

2. Gunze's Maziora:
Photobucket
Again the particle is too large.....

Note that i m testing the paint on a 100% pure black base .

Photobucket
Gloss coated: Effect's slightly better, but still not good enough......

Photobucket

Photobucket 
Tested on a second Maziora paint. Effect slightly better n more visible. However, it still have the problem of particle being too large......

(Note: After testing with black background, i tested on some silver reflective background too, which i found that the effect is different; not really suitable for a car body paint, but extremely beautiful for getting a heat stain effect.)

**********************************************************************************
Rim:


For the rim, will not be using any color shifting paint, but am trying to create some color variation within one metallic color. Hence am adding a little clear yellow, n black. Hoping to create an effect that only under strong light, the rim's metallic will bring a little bit a yellow tone; while under normal light, the rim will remain a cool tone of metallic grey.

Photobucket

Final effect: Not as obvious as i anticipated (Almost cannot be captured by camera:()....
Photobucket

Photobucket 

**********************************************************************************
Flocking Powder: The making of 1/24 scale carpet

As usual, being a cheapskate, I only have 1 color flocking powder: White! The reason being, with white color powder, i can dye them into anyother color i like; as a result, save money from buying all different color powder.....
Photobucket
KA model: I find this is one of the better ones in market. Very fine powder.


Photobucket
Double sided tape, then sprinkle the powder onto it. Please do not mind the middle part: Cannot see, no going to work on it..... Yes, cheapo + Lazy bum....


Photobucket
Credit to Entau: This is a very useful technique. I lay on the powder first, then, i spray the entire thing; part of the car interior n the carpet (flocking powder) together. The good part about working this way is: first, save time. Second, u will get very close colors for the carpet n the car interior, which is pretty common in real car.

Am pretty happy with the effect! :D
***********************************************************************************

Disaster!!!!!!! 


This round, since by coincidence, I found my old, 10-year-old Tamiya grey primer; I decided to prime the whole kit with it. However, seema like the primer cannot withstand very heavy wet coat of lacquer paint n thinner.

The primer has chemical reaction!!!!!

PhotobucketPhotobucket
As from the photo, it's very visible there's a patch of "Rashes" on the part. From observation, it's actually cause by the primer: The layer looks like it inflates n there's actually air bubble formed in between layers....

Photobucket
So, there's a dilemma: whether i should strip all the paint n primer, or i shall go ahead with it? Finally i decided to choose the latter, which is the beginning of a nightmare......

So i decided, instead of wet coat the base black, I did mist coat. To further be safe, i even use flat black as base; for flat color tends to get hold onto the base easier....

With 2 layers of mist coat, i will only do a wet coat when i m spraying the layer with pearl powder. Hopefully the already cured base color will serve as a buffer between the primer n the wet coat later.

So does it save me from all the trouble?


I guess the answer is definitely "NO". The photo below is an example of how the primer creates buuble holes when i did the pearl coat (wet coat). 2 layers of black paint seems like not enough to protect the primer......
Photobucket

(Nightmare continues....)