Props:


 Ha! I know.... mold line......


************************************************************************
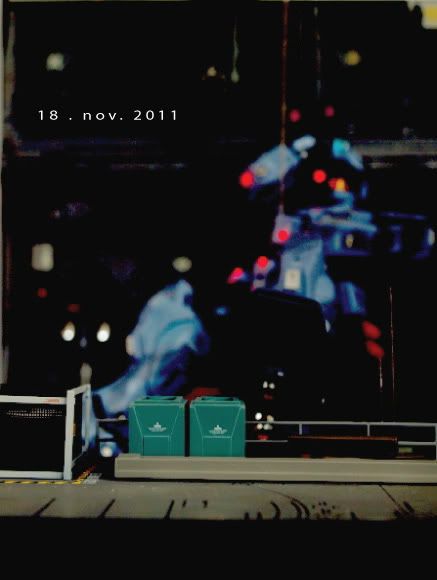
Title: "If I stay still, they can't see me.."
Chuck felt so stupid as, for a moment, he seriously consider that would actually work.
Background story:
Simple as it is. On Tuesday night, a troop is being sent to a Zeon base, to sneak in n plant some time bomb.
A GM custom drop down, from the top. Just before he reaches the group, he's stunned; realising there r many laser pointers from machine guns on his body.
Yeah, this unfortunate GM's surrounded by a group of Zakus, pointing their guns n ready to shoot in case of any sudden movement.....
Ha! I know.... mold line......************************************************************************
Title: "If I stay still, they can't see me.."
Chuck felt so stupid as, for a moment, he seriously consider that would actually work.
Background story:
Simple as it is. On Tuesday night, a troop is being sent to a Zeon base, to sneak in n plant some time bomb.
A GM custom drop down, from the top. Just before he reaches the group, he's stunned; realising there r many laser pointers from machine guns on his body.
Yeah, this unfortunate GM's surrounded by a group of Zakus, pointing their guns n ready to shoot in case of any sudden movement.....
__
The execution:
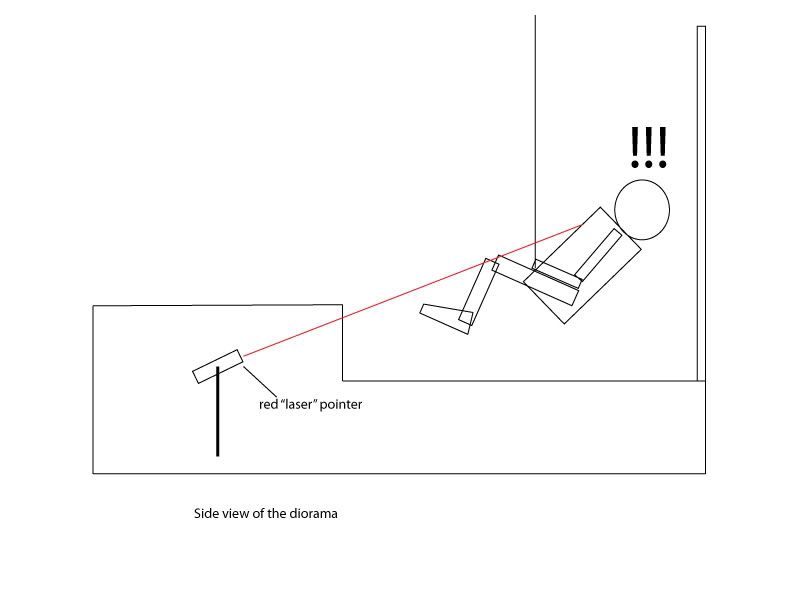
Basically this small dio/vignette has 2 main gimmick:
1. powering laser pointers to create real laser light onto the GM. Tried to make the laser points shake to simulate the natural movement of unstable hand of human beings. But failed.
2. The ceiling/roof of the hanger is being cut off. Use a transparent rod at the back n wall to hold the GM. To create a "floating" illusion.
The concept of execution can be found in the wip thread. http://forum.zerogunz.com/viewtopic.php?f=117&t=10792
************************************************************************
The lesson learn:
Ok, i m not sure how i m gonna make this simple n clear.
From the begining, i think this is a very brilliant idea; until the stage i start to plan the placement of all props: the mecha n the lights.
Due to the size limitation n wanting the dio to stay as tight as possible, there leaves not much space between the GM the the laser pointers.Since the position of the laser pointer is much lower than the GM, naturally it creates an angle where the laser pointer will shoot.
As a result, there r many parts of the GM where the laser point cannot reach. Worse, those crucial parts eg, chest. Even if I try to substitute the laser pointers with a big round torchlight, the supposed to be round shape light appears to be oval shape.
I should have scrapped the whole idea by that time. However, i didn't. Thinking of "maybe" i can find a solution later, I continue construction of the GM, the wall, the ground, n all the props.
In the end, I realise that limitation due to my initial planning, I have had reached a point of no return. I might move the position of the ramp, or building the base in another way where laser pointers can be hidden in a higher position. But everything's too late. I have less than 2 weeks for this.
The end result, yes, there r some pretty interesting red dots on the GM, but the story telling is so weak that i believe nobody can understand it in first glance. I have put a comic strip style title, yes, if the viewer spent more time reading the title n study the dio, he will understand, he might even catch the humor. IF only he has n willing to spend the time.
So this is the big lesson I learned: If u see something might be wrong, deal with itimmediately. At least simulate the whole thing in your brain n visualize it first. Dont believe the urban legend that things will be fine by its own when time comes. Miracle doesn't happen to lazy people.
Trouble the troubles, before they trouble you - quote Angel Kay
Another big lesson is: The difference between dream n reality, difference among different medium or matters of execution n expression. Certain ideas are best expressed in certain mediums n bad in others.
Take this laser pointer for example:
1. In drawing, usually what is used to present guns with laser pointers pointing at you is the faint red line going out from the gun n falls onto your body. NOT merely the red dots onto your body.
2. In movies, even if sometimes they do not show the red lines, movie has the luxury of bringing out the humor in many frames, or time. In other words, in movie, it has a series of movement, actions, sounds, lights, or even conversation to bring out the humor (I can amongst imagine stephen chow's movie, he would be saying, "Yiiiuuuuu.....") But in a static model kit dio, we dont have this luxury
The third big lesson:
If the idea cannot be executed, due to many reasons; painful as it as, when u need to scrap it, u gotta scrap it.
***********************************************************************
No, i m not being too critical onto myself. In fact i m pretty proud of this project though it has so much flaws. Am just sharing what i've learned.
Last, but not least, thanks to all my brothers n sisters for giving all your love n supports, ideas n criticism. Specially to Kong, Guitarist, Phoon, Zero1st, n Entau for bringing in all the positive energy, motivation, n stupid jokes during the blood n sweat moments.