Friday, November 13, 2015

Malaysia 2015 GBWC - A lil' Ah Pek's Opinion

Yesterday finally I brought myself to IPC to have a look at Malaysia's 2015 GBWC exhibition.

Being a self-claimed retired modeler, this is the second time I can have a look at the entries from a 3rd person view :p

First I would say this year's response is an all time high. Well, lots and lots of new challenger works; which I will see it as a very good sign for Malaysia Gunpla community. Having a lot of entries and newcomers is definitely a good thing, but how's the overall standard of the entries?

Besides the few veterans, majority I observe falls in the same group: Lots of kitbashing n creativities shown, but quite lack of the emphasis in fundamental work. Maybe it is also the way Kawaguchi is choosing the entry to go to final; i realised it's somehow slightly different from the traditional scale modeling criteria, where fundamental works aint emphasized so much but creativity n diversity of subject come first. In fact, focusing too much onto fundamental works somehow might have become a hindrance to achieving high in GBWC. Meaning, time should be spent less on basics, but stretch more of the wow factor.

As a result, I see a lot of big crazy slapping of parts, big amobitious effects n dioramas but all falls flat on execution; well, at least from a POV of a traditional scale modeling. Being a old timer, it's kinda hard for me to see an entry that uses 3 or 4 kits bashed together, but showing all the weakness in tackling mold line, sink hole etc. However, will i be giving advices to improved all these if i were asked to give comments? I am not sure anymore, especially if i know the modeler is trying to get something from the "competition".

Maybe is best for me to say, maintain a ok finishing kit, but stretch more on your presentation n kit bashing, that will help him go further in GBWC.

I realized I am totally outta league.

So, instead of giving comments n opinion closely regard to the competition, I now see it more like a retired old man seeing a carnival. Just pick some of my own favorites n say my own thing; that probably kawaguchi will have a big laugh.

Here's some of the entries that i find interesting, and my comment as an ah pek:

1. This is Jeffho's outta box entry. Hoho, seems like Jeff is kinda like gambling on this one. It can be a hit or miss thing for him as having a realistic female face so far aint something Bandai has shown interest in. Anyway, For me, I absolutely love it!!! Especially love it as in not showing a lot of skin as to commercial product that was targeting to Otaku's lack of opposite experience n unrealistic female anatomy fantasy.
Finishing is definitely top notch, I would even say from my limited time spent in looking at all the entries, the best finishing of all. Decal work is definitely my favorite! Carefully chosen, placement designed, workmanship; are just perfect decal work
The only pity thing is it is limited to the 50cm height of the competition rule. To me, this perfect grade sized kit should levitate even more, than what it is not; the extra space between the kit n the beautiful base would definitely give this nicely done kit a more majestic look.
Huhu, u can call me bias, but hell, Jeff being in the top list of my favorite Malaysia modeler is definitely no mistake.
The eyes, well, maybe the upper eye lid should be slightly lower. Now i suspect the eyes r a lil scary for some.
Overall, it is kit like this that makes the trip to IPC worth.


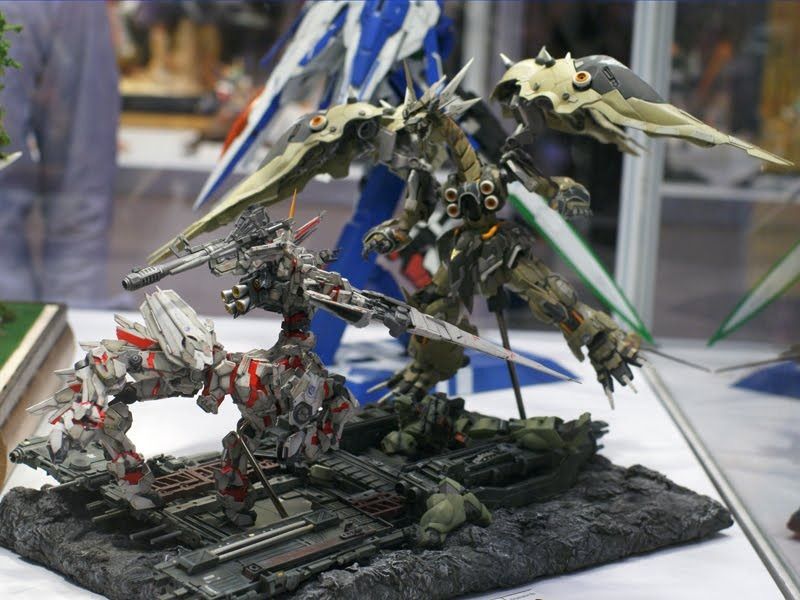
2. Phoon's. Frankly, the real thing looks much better than photo. This is sometimes that surprised me as Phoon's work usually are photogenic, looks much better in photo than in real.
Inititally, I hated the blurdy hole in the middle of the book  (Hahahaha sorry Phoon). But as usual, phoon is an artist that works better with hands n eyes than careful planning. The way he tackle the rational problem of having a hole in the middle of the book really well. I must say so well, it is extremely clever n nice!
Besides that, from photo all the non-related props at the back (the gasaphon thingy) do looks so good and they really adds a lot to the overall beauty of the whole dio/vignette. In fact, overall this is the most enjoyable work of him for me in recent years.
Definitely, despite looks like an easy project, I think the workmanship, art value of this diorama si definitely one of phoon's best!
Being an ah pek, of course i will still nip pick a lil, I would think the contrast of real-life-full-color vs the fade color from the the book's graphic of the main character should have been more contrast. That will b a better transmission  of message that the color of the character is transforming from book graphic to real life.
P/S: the workmanship of the background, the cutting of various shape is very perfect.... Phoon, u use CnC machine? Huhuhu. is as good as that.
 photo IMG_20151112_150509-2.jpg


3. This is Evon's. Ok, maybe just being bias as her sex. No, really, this caught my attention. I always fond of the mixure of gloss n semi gloss/flat finishing on the armor. (yeah, shermen's blue frame is still my favorite, and elliot's black unicorn kinda painting style still in one of my arsenal of ideas).
Not only that, I am amazed that the flat/semi gloss part is actually created naturally by the existence of pearl powder, not due to a final flatbase filled top coat. From my experience, this is nvr easy to achieve; and might cause problem at later stage; eg silvering of decals; which I am kinda afraid to attempt that effect. Evon seems to pull it off pretty well.
As for the grumpy ah pek side: the pose. standing straight is not much to see nor comment. The only thing i dont get is, I suspect the back where she should have done quite some stuff, but posing as such, she could have just save all the time she spent there. It makes no difference; nobody can see them.
Again, back to having prejudice on sex in this hobby, I would really hope she could be determine to spend enough time for next year for a better project; so, Malaysia, or probably the whole world would have the first female open category GBWC champion. Hohohohoho!!!!


4. Another female modeler's work. Ok, yes, i remember she is a female (we more like brothers :p)
Jac's work actually surprised me. I think she has an art sense that is still not "commonized" or "polluted" by the typical Gunpla builders' preference.
I feel so fresh seeing this work of hers.
Yes, there're still some workmanship issue that i believe she can definitely take care off, which she didnt (I suspect the usual last minute rush). However, from the subject, idea, to choice of color, I m simply loving this. Especially the color of the inside wall of the sphere. Probably is from her art sense developed from miniature painting. The best is, in her work, there is a sense of surrealism art, which is my favorite art style. Ok, true, weirdo, probably love to dream a lot kinda weirdo, produces beautiful work.
I am imagining how her rendition of phoon's work, if it is build-ed by her. hahahah!
In terms of workmanship, a little more tidy up would be really nice. I am not even talking aboutthe small details on the suit. Just a simple perfect clean glass face mask in contrast to the dirty space suit would bring the whole piece up a level.

5. I know him thru Facebook, with the name Kah Hoe.
Ok, this is definitely bias. First, his age. Second, from photos, his workstation. It really makes me cry, then feel so ashame, then have so much respect for him.
Without considering this two factors, i think his work is pretty good, is one of the best but not really the best. In terms of creativity, the major problem is carrying a little too much of Andy Wong's last year champion work; only with a lesser integrated design n slightly weaker workmanship. Well, from the words, it sounds like it has nothing much to shout about? But no, again, i look into the disadvantages he has: his age and resources he has, this fella is screaming 'I m the king' silently.
I see a lot of potential in him!!!

******************************************************************************************************************************

That's about all, from a old ah pek. All the best to everyone!!!!

Tuesday, October 27, 2015

SD 1943 Yamato ShoeBox Diorama #2

Just a little update:

When I first decided to make this into a shoe box diorama, I was thinking of having clear acrylic of glass at the side, not only relying onto lights coming from the front/top panel, so that there ll be more light at the bottom part of the diorama. However I called the idea off as i realised seeing thru the side panel, makes it visually very distracting n complicated.

Therefore I have decided to use frosted mirror at the side, and put some LED as artificial light source.

This worklog is a brief record of how I've done it:

This is basically I plan for the placement of the LED: on the photo frame, shooting the light inwards, reflected by the frosted mirror  for a more evenly distributed light.
 photo P1012154.jpg

Instead of using dry cell bettery, I decided to use live wire battery with a AC/DC adapter. This is the adapter i use to connect.
 photo P1012155.jpg

The good thing about this kind of AC/DC adapter. First, it's cheap. Second, adjustable voltage (to control the brightness :p), third, adjustable positive n negative (Huhu)
 photo P1012163.jpg

Good about this kinda adapter is: no need of soldering. a simple screw lock.
 photo P1012156.jpg

Ta Dah!
 photo P1012161.jpg
The final result is kinda satisfactory :)
 photo P1012165.jpg

***********************************************************************************************

Some random picture that supposed to be posted in the previous update.... heheh
 photo P1012145.jpg

Monday, October 19, 2015

SD 1943 Yamato ShoeBox Diorama #1

I have been eyeing on this series of SD kits, from vessels, tanks,to F1, the designs always caught my life. As a result, I decided to try out this kit:

 photo 10256479.jpg

I have used Fujimi's Photo etched set on this kit. Nothing much to mention here coz didnt really took any photo for work log.In short is just attach the PE onto the kit, a simple grey tone.

The main focus of this project is to build a shoe box diorama, with a photo frame, to be display vertically as in the classic arcade game screen shot.
 photo maxresdefault 1.jpg  photo 1943 19.png
Some simple screen shot
*******************************************************************************************


 photo P1012118.jpg photo P1012117.jpg photo P1012123.jpg
Some basic color
**********************************************************************************************

 photo P1012132.jpg

 photo P1012131.jpg

 photo P1012128.jpg

The base sea surface: I use Vallejo water effect. As for the waves created by the Yamato, basically is just layer after layer of water effects.
***********************************************************************************************

 photo P1012134.jpg
 photo P1012137.jpg
 photo P1012138.jpg

After about 4 layers, am using enamel clear to create a slightly different tone. overall is slightly more greenish as compared to the deep water.
***********************************************************************************************


 photo P1012141.jpg

 photo P1012141.jpg

Just add a little explosion effect..... looks kinda cacat though.... hoho
*************************************************************************************************

 photo P1012144.jpg

Getting ready the acrylic board for the walls of the shoe box dio. The whole thing divided into 3 layers for the yamato, planes, and various effects. Let's hope the different layers will bring a satisfying result....

********************************************************************************

Wednesday, September 2, 2015

MITEAM - Alphaleo

* MITEAM: A short form of the phrase " Modeler In The Eyes of A Modeler". This is just a simple blog based on my personal view to pay tribute and respect to fellow modelers who i know as personal friend.


 photo Real_Alphaleo.jpgName: Raymond Yap

Pseudonym / Nickname: Alphaleo

Usual Genre: Gunpla, Sci-fi,

Description: A animator in profession. This modeling friend of mine is truly a low profile one. Only being active in deviantart and forum (a few years back). Even during the forum time, he is not the type where he will make u notice him by post or spam or cracking jokes or anything. People will just know about this fella who love to use a white lion to represent himself through his work.

Being a commercial artist, he has idea. However, in modeling, the most impressive stuff is, he is willing to break his own zone to recreate his vision into a 3D model kit.
 photo alpha P1060438_zps891d447d.jpg

When I first knew him, he was still quite new in the hobby, learning all the basics. However, as far as that's his vision concern. there is nothing can stop him. Can't find the model? Can't find the parts that suits the modification? He just go and scratch build it!! no matter how risky they r in the eyes of old school modeler like me, he just went full gear n try his best to create it.

Yes, in terms of bigger size scratch building, probably among my group of friends, there are Alphaleo and Julius Lim (that is another crazy builder whom i am tempted to talk about later).

From his first work that caught my attention: HG unicorn where he build to join Unicorn vs Blue Frame GB in ZeroG forum, which he used 4 (or 5?) HG unicorn and various scratchbuild to create a unicorn Centaur. Ok, the weathering n finishing wasn't top notch, but the modification got my jaw dropped. It was just too beautiful!!!!.

Later on, he build another HG Kshatriya, and this time he modified it to become a 2 footed dragon!!!! On his second piece, the weathering n finishing is already a level up from the unicorn. This work of his,  Unicorn Centaur vs Kshatriya has won Malaysia's BAKUC Champion and world's 1st runner up in the year of 2010!!
 photo alpha P1000203.jpg  photo conquer_vs_defense_by_alphaleo14-d87ecys.jpg  photo Gundam_unicorn_centaur_WIP_4_by_alphaleo14.jpg  photo Gundam_Unicorn_Centaur_by_alphaleo14.jpg  photo pg_ms_06r_2_zakuii_by_alphaleo14-d3hcic1.jpg
Monster Modification vs Finishing

After that, he tried on another scratchbuild frenzy project: converting a PG Zaku into a High Mobility Zaku (note: is for Weathering vs Metallic GB). Personally, for the modification part, i think is absolutely impressive!!!! The only thing is, besides scratchbuilding a ton of parts there, he made it a candy color zaku; which is like a almost zero tolerance to finishing n flaws; the finishing of the kit was being compromised. This, I really think is a pity.

After that, a unicorn/sinanju hybrid, which personally, i think there s a lot of improvement in finishing, but still, in comparison to his modification work, still consider a weak point in his build. (Please dont get it wrong, although i might sound like his work is crap, but in fact they r not. he's still winning in competition after competitions. I am merely comparing the level of his modification to his finishing.)

Not sure whether it is because of this or due to his work load, after that, his projects started to become smaller.

- Gundam NT1, won (2012?) 3rd in GBWC, with not as much modification as his previous projects, but he showed the world he is capable of achieving great finishing.
- Leo San. This is definitely another gem!!!! With loads n loads of highly skilled modification and scratchbuilding, not as lous as his previous projects, but he manage to keep a high quality scratchbuilding and pretty good finishing!!!! I am so love of this project!!!!
- Ball Minion. This one can show his level of confidence in scratchbuilding n finishing. Seems like it s a rush project, but he managed to pull it off with no problem at all. More importantly he showed that his is comfortable in building kits with such high level.

From these 3 projects, I am having more n more confidence onto him. He didnt rush it, but took his time, keep improving what he's weak at, and making what he is strong at, even stronger!!! I am almost seeing another modeler among my friends whose work is going to be something I could never able to build!!! Yes, a little envy, but i am more happy and excited. I believe if his work load is not stopping him, his next mega project will be one that will be shared and seen in the internet for a very long time!

And as for competition wise, I hope Bandai will not push their not-value-finishing judging criteria to far too soon. I believe his work will awe the world.

Yes, I am hoping to see a classic born from his hands!!!

Website: The only site i know where he share his work is his Deviantart. http://alphaleo14.deviantart.com/
 photo sinanju_pegasus_by_alphaleo14-d5bwyh7.jpg  photo alpha P1060432_zps71d3790e.jpg  photo alphaleo_won_silver_in_bmkwc_by_alphaleo14-d366755.jpg

Thursday, June 4, 2015

Hoi Hoi San x Tomb Raider ver.

Ok, as usual, pictures first, talk later.


 photo P1011792.jpg  photo P1011789.jpg  photo P1011796.jpg  photo P1011803.jpg  photo P1011797.jpg  photo P1011802.jpg  photo P1011799.jpg  photo P1011807.jpg  photo P1011815.jpg  photo P1011822.jpg  photo P1011790.jpg

This is a project I have had for years; not because that it's such a hugh project where i need collect tons of material, ok, just being lazy.

Initially I was only planning to use the Hoi hoi San with heavy weapon kit, which i bought over from tkting with a very nice price (Thanks bro!). Since the early version of Tomb Raider wasn't wearing a singlet anyway. The main difficult part is to modify the torso part: where the flesh revealing shoulder joining the upper arm. If I were to make it movable and look fitting n natural at the same time, I realised it was not exactly a Sunday walk in the park.

Fortunately, last year I found a young version of Hoi Hoi San during Gamer's Arena sale. The kit consist of costume of a high school swimsuit (I can use for the singlet/tank top), a movable abdomen (A better flexibility, and maybe give her to reveal some flesh near the belly like during the late 90's fashion), a gym short pants (much nicer compare to using the original underpants, and easier to to scribe lines too), and a half height socks (perfect for modifying into the upper part of a boots, yet show a little white socks). This seems to be the perfect kit, which just make my days so much easier!!!!

Finally, a hybrid of these 2 kits.

The two hand guns are scratch build. didnt put much effort in them. As long as they fit the standards of a fun project.

This round, 3 layers of skin tone, both pre and post shade. All the other items are just preshade.

The glove is just masking n spraying different color to create the impression.

The boots, a big mistake. I am using the socks, modify it to become the upper part of the boots. while the bottom part of the boots, i use the original hoi hoi san shoe, which I supposed to test fit and modify them to fit; which i didn't. Actually now it looks like this tomb raider is wearing a brown slipper, worse, a too-large-slipper. The show lace is soldering wires. the metallic looking eyelet for shoe lace is just metal transfer.

Another big problem I had during this build is the joint. Since all the joints are actually Ps plastic to PS plastic, I need to really make them loose first, then tighten them again after painting. make them really loose! Which i didn't. Assemble proved to be a challenge, changing position is a nightmare!!!! and i have broken a joint doing so!!!!

Overall, I am satisfy with this project. Satisfy not because of the level of finishing, satisfy because I finally make my vision into a real thing.

P/S: A big thank you to Klay for giving my the treble fish hook!!!!! Yes, Lara Hoi Hoi San can climb now!!! XD