Thursday, April 28, 2011

Daihatsu Copen Wip (Part 3)

Update: 28 Apr 2011

While busy repainting n tackling the problem on the car body, I continue to take some time to continue on other parts of the kit.


Suspension
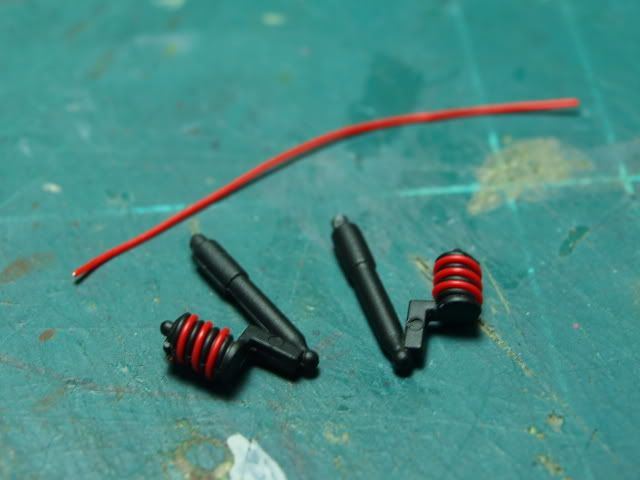
Photobucket

Ok, I m lazy, I admite that.... Instead of scribe off  spring on the suspension, I m using a thin wire to wrap around it. The main reason I m doing this is because basically the suspension is not really visible after assembly; basically all I want is some glimpse of other color than the chasis (Black) to create the impression there's a suspension made.

*********************************************************************************

Brake Disc

This is something absolutely new to me; and is one of the high point for me in this build. A metal brake disc. I think the visible real metal color does add up to the overall impression of a plastic model kit. Just love how other modelers r using them. Hence, decided to give it a try in this build.
Photobucket
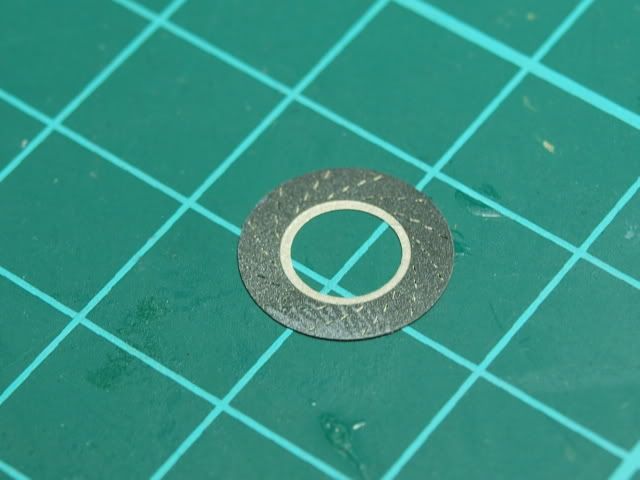
This is a photo etched brake disc. As Entau's pointer, I do agree the original texture of the metal doesn't look nice.

Photobucket
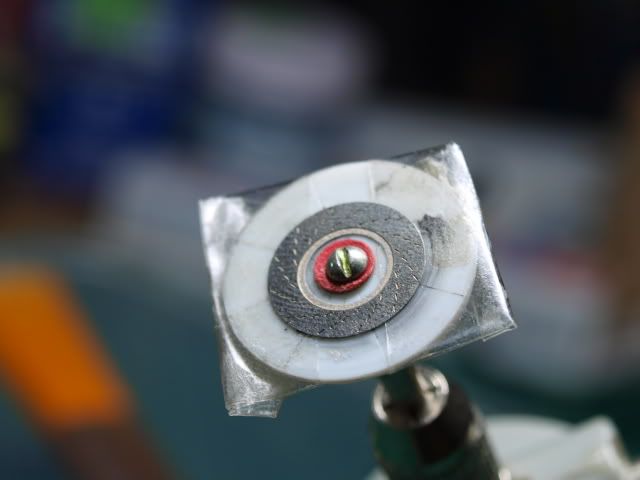
Cut out a small piece of pla plate, screwed tight, n put it on a router. The double sided tape is for the purpose of securing the photo etched piece onto the pla plate.
Photobucket
This is how it looks like before I have done anything. All the marking on the pla plate is actually to make sure the photo etched (PE) brake disc is placed in the centre .

Once everything is done, START UR ENGINE & MAKE IT SPIN!!!!!!

Photobucket
With the help of sand paper, I m recreating the texture on the disc, which in real life, is created by the brake pad.

Remark: Learned something here again. Entau was suggesting me to use sand paper of 320 grit or below. However, being cautious, I afraid that grit might to too rough and spoil the whole thing. In the end, i realised due to I m using a finer grit, I need to apply more force n sand it longer. This prove to be a mistake, because the longer n harder we push the sand paper onto the PE part, the easier we will make mistake.

Check out the photo, u can easily see an even force being applied n the texture is not unified.
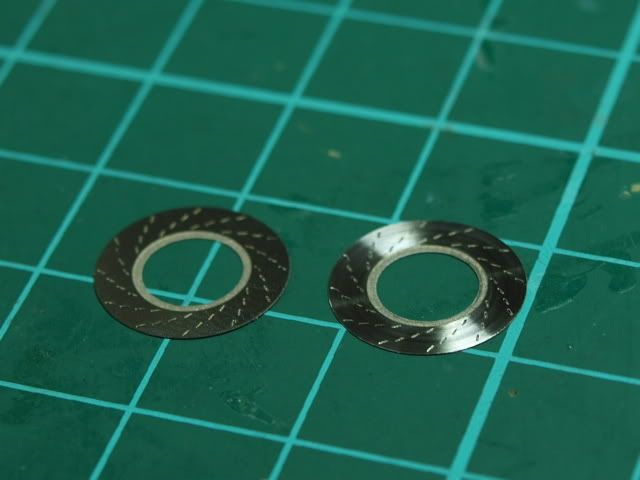
Photobucket
Before & After: Left (Original), Right (After sanding)

Photobucket
Done!!!! I m pretty happy with the result! :)

********************************************************************************
Metal Transfer:

My personal opinion: Metal transfer does add life to a kit, especially car model kit.

Most of my group of friends are actually from Japanese anime based kit modeler, metal transfer doesn't seem to be very popular n well utilized.

My point is, besides car emblem, metal transfer actually can be used creatively; as other option parts in Gundam or other model kits. Below I will show how 2 gunpla modelers (Klay n I)  utilize the creativity in Gundam modeling  n apply it onto a car kit.

Photobucket
This is how metal transfer decal look like. Basically the shiny parts are real metal, very thin n coated with a self adhesive membrane at the back.

Photobucket
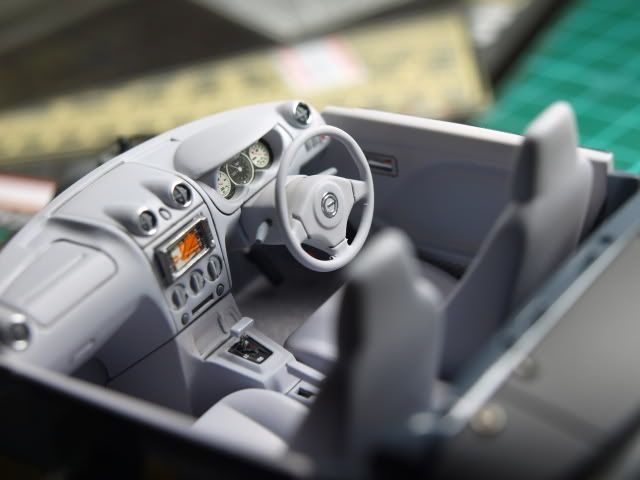
The air cond outlet: The original outlets are pretty ugly. No panel line, not much details neither. I sprayed the light gray first, and hand painted the inside part with enamel dark grey. Since there's no marking, detail, nor panel line, everything's done "agak agak" only.

So I use a ring shape metal transfer piece to cover up the edge. Purpose:
1) to cover up the uneven n ugly border of the light n dark grey.
2) to divert the attention of the viewer "from" the ugly air cond outlet "to" the blink blink metal part.
Photobucket

Besides that, there's another small accident happened: The original decal (Ugly, but I had no choice because the steering wheel is really empty) was accidently torn off.

Klay was around in ICW that time so I passed the task to him with just one instruction: "I dont care what u do, as long as I want this steering wheel doesn;t look empty n looks good again" I left it to his creativity.

In the end, he used 2 piece of metal transfer, 1 ring 1 that looks like a "G", put them onto the steering wheel which I think the end result's pretty ok.

Photobucket

That's all for this round. (Go back to the car body again.... Sigh)

Thursday, April 14, 2011

Kotobukiya 1/1 Hoi Hoi San

This is quite a fun kit from Kotobukiya, not extremely user friendly, but easy enough.

Was testing n practicing on very subtle pre-shading with loads of fluorescent color. The final effect ain't really what I expected; but not too bad.

Not much modification, just mod a little bit for separate parts coloring. Overall, it's just a fun n stress-free build.  


Overall
Photobucket


Photobucket


Photobucket


Photobucket
 
This is the main problem I had for this build. Initially, the seamlines on the hair was covered. Due to the mechanic design of the hair, that part was extremely fragile. In fact, there r some parts that I didn't even anticipated there would be force during assembly.
As a result, there's a crack.....T_T

Photobucket


Photobucket


Photobucket


Photobucket


Photobucket


Photobucket


Saturday, April 9, 2011

Daihatsu Copen Wip (Part 2)

Color:

The color of this car: am thinking of a color shifting metallic effect; either a 1 color color shift or a 2 color one.

Paint tested:

1. Alclad's Prismatic paint:
Photobucket
It must be something i m not doing it right. When I spray a very thin layer, the color didn't turn out bright enough. In addition, there's quite some noise spotted.

Second attempt, spray a thicker layer. The duo tone effect's visible, but still think the particle is too large for a 1/24 scale car body.....

P/S: In the photo, it looks like it has one tone of blue only. This is mainly because i m having problem capturing the red tone....
*********************************************************************************

2. Gunze's Maziora:
Photobucket
Again the particle is too large.....

Note that i m testing the paint on a 100% pure black base .

Photobucket
Gloss coated: Effect's slightly better, but still not good enough......

Photobucket

Photobucket 
Tested on a second Maziora paint. Effect slightly better n more visible. However, it still have the problem of particle being too large......

(Note: After testing with black background, i tested on some silver reflective background too, which i found that the effect is different; not really suitable for a car body paint, but extremely beautiful for getting a heat stain effect.)

**********************************************************************************
Rim:


For the rim, will not be using any color shifting paint, but am trying to create some color variation within one metallic color. Hence am adding a little clear yellow, n black. Hoping to create an effect that only under strong light, the rim's metallic will bring a little bit a yellow tone; while under normal light, the rim will remain a cool tone of metallic grey.

Photobucket

Final effect: Not as obvious as i anticipated (Almost cannot be captured by camera:()....
Photobucket

Photobucket 

**********************************************************************************
Flocking Powder: The making of 1/24 scale carpet

As usual, being a cheapskate, I only have 1 color flocking powder: White! The reason being, with white color powder, i can dye them into anyother color i like; as a result, save money from buying all different color powder.....
Photobucket
KA model: I find this is one of the better ones in market. Very fine powder.


Photobucket
Double sided tape, then sprinkle the powder onto it. Please do not mind the middle part: Cannot see, no going to work on it..... Yes, cheapo + Lazy bum....


Photobucket
Credit to Entau: This is a very useful technique. I lay on the powder first, then, i spray the entire thing; part of the car interior n the carpet (flocking powder) together. The good part about working this way is: first, save time. Second, u will get very close colors for the carpet n the car interior, which is pretty common in real car.

Am pretty happy with the effect! :D
***********************************************************************************

Disaster!!!!!!! 


This round, since by coincidence, I found my old, 10-year-old Tamiya grey primer; I decided to prime the whole kit with it. However, seema like the primer cannot withstand very heavy wet coat of lacquer paint n thinner.

The primer has chemical reaction!!!!!

PhotobucketPhotobucket
As from the photo, it's very visible there's a patch of "Rashes" on the part. From observation, it's actually cause by the primer: The layer looks like it inflates n there's actually air bubble formed in between layers....

Photobucket
So, there's a dilemma: whether i should strip all the paint n primer, or i shall go ahead with it? Finally i decided to choose the latter, which is the beginning of a nightmare......

So i decided, instead of wet coat the base black, I did mist coat. To further be safe, i even use flat black as base; for flat color tends to get hold onto the base easier....

With 2 layers of mist coat, i will only do a wet coat when i m spraying the layer with pearl powder. Hopefully the already cured base color will serve as a buffer between the primer n the wet coat later.

So does it save me from all the trouble?


I guess the answer is definitely "NO". The photo below is an example of how the primer creates buuble holes when i did the pearl coat (wet coat). 2 layers of black paint seems like not enough to protect the primer......
Photobucket

(Nightmare continues....)