Update: 1st November 2011
This is a brief record of how i m going to make the laser pointer:

This is the brand i use, can be easily find in the mraket. Cost is around RM4~RM8.

tear away the sticker n the seamline is revealed.


Use a plier, slowly pull out the top part.

This is the circuit board. The whole thing includes a UV light LED, and a laser pointer.


As u can see, the part with the spring is actually connected to the negative side of a battery; while, like many other torch light design, the positive is actually the entire metal part of the device that our hand is holding. the electric current is actually transfer via the metal body of the laser holder n the metal part at the front.
*Note: the switch is actually a contact switch n not an on/off switch which i made a mistake while i edited the photo. contact switch means, u press the switch, the circuit complete n there's current. But once u release, it automatically cut off.


I realised that the so-called "laser" is actually a focused LED light. The lens inside it has made the redius of the light source become very small. As a result, it looks like one point. In fact, when u move the source further away, the dot will become bigger.
It's not laser afterall....
The second photo shows the lens that's initially set inside the metal tube at the front. I accidently make the the thing out. I was trying to solder the wire onto the metal part, hence i heat up the part . As a result, everything inside popped out (one wasted T_T)

Study a bit on the circuit board; it's a fairly simple one.

Cut off the UV LED. Besides that, i have decided not to mess with the contact switch, but instead, i find creating a bypass/loop is much easier.
Reason for doing so it, the transistor n LED inside is extremely sensitive. Without any protection, when i connect it to a current, thru my skin, very small current exist n cause an extremely small short circuit. very small till normally we dont even notice it. But here, it will immediately burn the laser pointer.
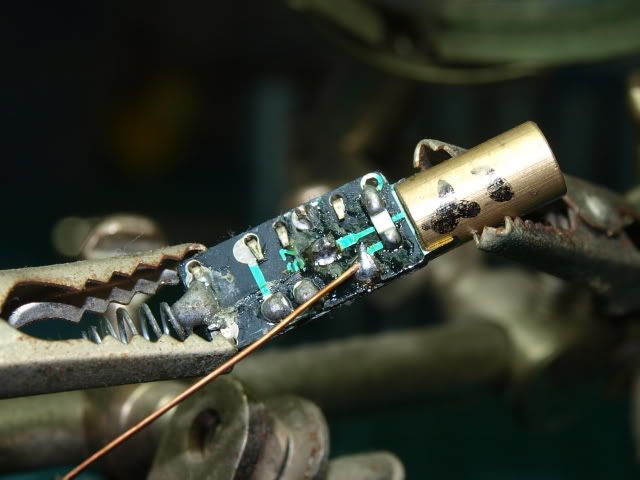
solder one side, with a brass rod from a single core wire.

Done! Huhu.
Note: again, the board is so sensitive, when i was soldering n i wasn't careful n made mistake, keep on redoing on it the heat will also burn it...


solder the negative.

wrap it first, just in case anything happened. protection is important.

now the positive.

Done.
Yes, it's not the best looking laser pointer, in fact, looks like a mummy sausage. But as long as it gets the job done i m ok. Besides that, everything is 80% hidden, so i couldn't care more.....
This is all for now..... i hope i wont get bashed as bad as my previous stick boy post.... afterall, electric n light can be quite usual in diorama building....
C&C welcome
This is a brief record of how i m going to make the laser pointer:
This is the brand i use, can be easily find in the mraket. Cost is around RM4~RM8.
tear away the sticker n the seamline is revealed.
Use a plier, slowly pull out the top part.
This is the circuit board. The whole thing includes a UV light LED, and a laser pointer.
As u can see, the part with the spring is actually connected to the negative side of a battery; while, like many other torch light design, the positive is actually the entire metal part of the device that our hand is holding. the electric current is actually transfer via the metal body of the laser holder n the metal part at the front.
*Note: the switch is actually a contact switch n not an on/off switch which i made a mistake while i edited the photo. contact switch means, u press the switch, the circuit complete n there's current. But once u release, it automatically cut off.
I realised that the so-called "laser" is actually a focused LED light. The lens inside it has made the redius of the light source become very small. As a result, it looks like one point. In fact, when u move the source further away, the dot will become bigger.
It's not laser afterall....
The second photo shows the lens that's initially set inside the metal tube at the front. I accidently make the the thing out. I was trying to solder the wire onto the metal part, hence i heat up the part . As a result, everything inside popped out (one wasted T_T)
Study a bit on the circuit board; it's a fairly simple one.
Cut off the UV LED. Besides that, i have decided not to mess with the contact switch, but instead, i find creating a bypass/loop is much easier.
Reason for doing so it, the transistor n LED inside is extremely sensitive. Without any protection, when i connect it to a current, thru my skin, very small current exist n cause an extremely small short circuit. very small till normally we dont even notice it. But here, it will immediately burn the laser pointer.
solder one side, with a brass rod from a single core wire.
Done! Huhu.
Note: again, the board is so sensitive, when i was soldering n i wasn't careful n made mistake, keep on redoing on it the heat will also burn it...
solder the negative.
wrap it first, just in case anything happened. protection is important.
now the positive.
Done.
Yes, it's not the best looking laser pointer, in fact, looks like a mummy sausage. But as long as it gets the job done i m ok. Besides that, everything is 80% hidden, so i couldn't care more.....
This is all for now..... i hope i wont get bashed as bad as my previous stick boy post.... afterall, electric n light can be quite usual in diorama building....
C&C welcome
Superb WIP.. Looking forward to view more :)
ReplyDeletei found my answer thank you
ReplyDelete